Saturday, March 3, 2012

0 Fiat 124 1968-74 Axles Repair Manual

FIAT 124 (1968-74)

DESCRIPTION
Rear axle assembly is semi-floating, hypoid gear type with centerline of pinion set below centerline of ring gear. Axle shafts have integral wheel hubs and are supported in the differential case by side gears and in the axle housing by ball bearings. Service of these assemblies, with exception of axle housing, may be performed without removing complete rear axle assembly from vehicle
AXLE RATIO IDENTIFICATION
The semi-floating, hypoid gear type rear axle assembly with separate housing is used on all Fiat 124 models. The basic difference in rear axles from one vehicle model to another is the axle ratio. The Fiat 124 Sedan axle ratio is 4.3 to 1, and the Fiat 124 Sedan Special is 4.1 to 1.
REMOVAL AND INSTALLATION
Axle Shaft and Bearings
Removal - 1) Raise vehicle and remove rear wheels and disc brake front shield. Remove caliper support bracket mounting bolt and remove caliper (without disconnecting brake lines). Remove bolts attaching brake disc to axle shaft hub and remove brake dis and plate.
2) Remove snap ring securing bearing dust shield. Attach slide hammer and withdraw axle shaft assembly. Inspect axle shaft, bearing, dust shield and bearing retaining collar for wear or damage and replace as necessary.
Disassembly - Using suitable arbor press (A. 74108/1/2), press bearing retaining collar off axle shaft and discard collar. NOTE - Retaining collar must never be reused; replace with new collar. Remove ring, dust shield, and bearing. If axle shaft is scored or damaged, replace shaft.
Reassembly - 1) Install snap ring, dust shield, and bearing onto axle shaft held vertically on solid plate of arbor press (A. 74107/1). Insert new collar into suitable holder. (A. 74107/4), place in oven and place on axle shaft. Press axle into collar using 13,000 lbs (6000 kg) maximum pressure.
2) Place axle shaft assembly in tool A. 9560. Rotate axle by applying 58 to 61.5 ft. lbs. (8 to 8.5 mkg) of torque then check dial indicator reading at opposite end of axle shaft. Reading should remain at zero rotation of axle shaft.
3) Remove load from axle and recheck dial indicator to zero reading. This will insure that collar has not moved on axle shaft.
Reinstallation - Install new oil seal and "O" ring and complete installation by reversing removal procedure.

DIFFERENTIAL CARRIER
Removal - Drain fluid, raise vehicle, and remove wheels. Withdraw axle shafts for enough to disengage from side gears. Disconnect propeller shaft, support differential and remove attaching bolts. Remove differential assembly from axle housing.
Installation - Thoroughly clean oil residue from axle housing. Position new gasket in place and reverse removal procedure.
CHECKING AXIAL LOAD


OVERHAUL
Disassembly - 1) With differential secured in suitable holding fixture, remove two bolts and spring washers from caps and remove lock plates. Remove bolts and spring washers securing case bearing caps, and remove caps, adjuster rings and roller bearing cups. Remove differential case from carrier.
2) Turn differential carrier upside down and lock bevel pinion shaft and remove sleeve. Remove pinion, thrust ring, rear roller bearing cone and collapsible spacer from inside housing. Remove oil seal, oil slinger, and front bearing cone from carrier.
3) Slide collapsible spacer off pinion, then draw off rear roller bearing. Thrust washer can then be removed from pinion. Using a suitable puller, remove differential case roller bearings. Remove screws holding ring gear to differential case then use drift to remove pinion gear from case. Remove pinion gears, side gears and thrust washers.

REASSEMBLY AND ADJUSTMENT
Case Assembly - 1) Install thrust washers on differential side gears and position gears in differential case. Insert pinion gears in case and engage them with side gears. Align holes in pinion gears through openings in case and insert pinion shaft. Check axial play in each side gear.
2) Axial play should not exceed .004" (0.10 mm). If play exceeds specification, replace side gear thrust washers. These washers are available in various thicknesses. If correct clearance cannot be obtained, gears must be replaced. Assemble ring gear to differential case and torque to specification. Using suitable driver (A. 70152), install both roller bearings on differential case.
CHECKING FOR CORRECT
THICKNESS OF BEVEL PINION
REAR BEARING THRUST WASHER
Drive Pinion Depth - 1) Fit front and rear roller bearing cups of bevel pinion in position using suitable driver. Using same driver, attache cone of rear roller bearing to dummy pinion (A. 70184) then position in differential carrier.
2) Install cone on front roller bearing and place nut on dummy pinion. Turn pinion to seat bearing cones and tighten nut.
3) Zero dial indicator (A. 95690) on a surface plate then attach to dummy pinion. Position dial indicator to allow plunger to contact roller bearing seat in differential case. Obtain minimum reading on dial indicator by moving plunger from right to left. Record reading and repeat procedure on opposite side.
4) Determine an average from the two readings, then from this average, subtract the value stamped on bevel pinion to be used. This will give correct thickness of thrust washers to be inserted between the head of the pinion and the shoulder of rear roller bearing.
STAMPED NUMBER LOCATION ON
BEVEL PINION
5) If the number stamped on the pinion is preceded by a plus sign, the thickness of the washer to be used is derived by subtracting this number from dial gauge reading. If the number stamped on the pinion is preceded by a minus sign, the thickness of the washer is obtained by adding this figure to the dial gauge reading.
6) Place thrust washer (correct thickness) on bevel pinion, then rear roller bearing cone followed by collapsible spacer. Install pinion assembly in carrier and attach the front roller bearing cone, oil slinger, oil seal and "U" joint sleeve. Install washer and self-locking nut on tail of pinion.

Pinion Bearing Preload - Secure pinion to keep it from turning. Gradually tighten nut on tail of pinion shat to B7-166 ft. lbs. (12-23 mkg). Check turning torque of pinion shaft using dynamometer (A. 95697) and adapter (A.55075) fitted to pinion nut and set to 17 INCH lbs. (20 cmkg). If turning torque is less than 14 INCH lbs. (16 mkg), pinion nut must be tightened (without exceeding maximum torque). If turning torque is more than 17 INCH lbs. (20 cmkg), pinion must be removed and collapsible spacer changed.

CHECKING PRELOAD OF DIFFERENTIAL
CASE BEARINGS AND BACKLASH
OF BEVEL GEAR
Backlash and Side Bearing Preload - 1) Place differential side bearing cups on side bearings and place differential assembly into carrier. Fit two bearing retaining and adjusting rings, install caps and torque to specifications.
2) Attach suitable tool (A. 95688) (see illustration), to differential carrier. Adjust backlash between ring gear and pinion to .0031-.0051" (0.08-0.13 mm). Insure that bearings are not preloaded.
3) Set preload by tightening two bearing adjusting rings alternately with equal number of turns until dial indicator "A" (see illustration), shows an increase of .0055-.0071" (0.14-0.18 mm). After preload is set, check backlash of bevel gears.
4) To check backlash, set dial indicator "B" (see illustration), so that plunger rests against tooth of bevel gear. Rotate ring gear to obtain maximum reading. Backlash must be .031-.0051" (0.08-0.13 mm).
Final Inspection and Assembly - With pinion bearing and ring gear backlash properly adjusted, make a tooth pattern contact check. NOTE - Check gear tooth contact using point impression mothod described at beginning of this section. When pattern is satisfactory, install axle shafts, brake drums, wheels and tires, propeller shaft and refill with suitable gear lubricant.

0 Arrow 1976-77 Drive Axles Repair Manual

Models Covered:

  • Arrow 
  • Colt
DESCRIPTION
Rear axle is of the banjo type, utilizing the removable carrier style differential. Light weight construction joins split tubular housing for each side with center covers welded to axle housing. Final drive is of the hypoid style. Axle shafts are semi-floating type supported with bearings at their respective ends in axle housing. Bearings are fitted to axles with pressure type bearing retainers. Pinion bearing preload, side bearing preload, and pinion depth adjustments are made with shims while differential side gears are adjusted with spacers.

REMOVAL AND INSTALLATION
Axle Shaft and Bearings
Removal - 1) Raise and suitable support rear axle housing so rear wheels clear ground. Remove rear wheel and brake back plate nuts, then disconnect wheel cylinder brake line. Fix suitable puller set (CT-1003 and C-637) to lug studs and work slide hammer until axle shaft is free to be withdrawn. Set brake back plate with parking brake attached out-of-way. Using suitable tool (C-637 with hook) remove axle shaft oil seal.
FIG. 1 MEASURING AXLE SHAFT
DEFLECTION
2) To remove axle bearing proceed as follows: Grind down bearing retainer at one point until retainer thickness is .04 - .06" (1.0 - 1.5 mm) then chisel ground portion and remove retainer. Using suitable bearing puller or press (CT-1120) remove bearing from axle.
3) Using a dial indicator, inspect axle shaft deflection in three spots (see illustration). Replace axle shaft if specifications are exceeded.
                                 Axle Shaft Deflection Table
Application                        Std. Value                           Service Limit
Point "A".............................  0-.004".................................   .004"
                                               (0-.10 mm)............................. (.10 mm)
Point "B"............................... 0-.002".................................   .002"
                                               (0-.05 mm)..............................(.05 mm)
Point "C"............................... 0-.08".....................................  .08"
FIG. 2 EXPLODED VIEW OF AXLE
SHAFT ASSEMBLY
                                               (0-2.0 mm)..............................(2.0 mm)
4) Rear axle bearing should be replaced when bearing noise is detected, when bearing axial play exceeds .014-.016" (.36-.41 mm) or if bearing axial free play exceeds .001-.002" (.03-.04 mm) at approximately 11 lbs. (5.0 kg) measuring force.
5) Inspect wheel hub bolts for tightness and bearing outer retainer for deformation, replace parts as necessary.

Installation - 1) Fit outer bearing retainer for sie against shaft splined end, then install bearing and inner bearing retainer. Seat bearing retainer with smaller chamfered side directed to the bearing. NOTE - Ensure bearing is completely seated.
2) Lightly coat lips at oil seal and using suitable oil seal installer (DT-10078 and CT-1008) fit axle shaftt oil seal in rear axle housing.
3) Using packing and shim in proper sequence, set clearance between bearing and outer bearing retainer to .00-.01" (.0-25 mm).
4) Carefully insert axle shaft assembly into axle housing using care not to damage seal. Slightly turn axle shaft until splines line up with differential side gears. Align packing oil holes with outer bearing retainer and tighten bearing retainer to axle housing flange. Connect brake line to wheel cylinder and bleed air from system.

DIFFERENTIAL CARRIER
FIG. 3 REMOVING DIFFERENTIAL
GEAR HOUSING
Removal - Drain oil from rear axle differential housing, then disconnect propeller shaft. Pull out both rear axle shafts approximately 2 1/2". Remove differential gear housing mounting nuts and withdraw the differential gear carrier. It may be necessary to top outside of housing to break gear carrier loose.
Installation - Lightly coat each bearing and gear with oil. Apply sealing compound on packing and axle housing seat, then assemble gear carrier to axle housing with nuts and tighten. Fill differential gear housing with .96 quart of suitable multi-purpose gear oil (API GL-5).

OVERHAUL
FIG. 5 REMOVING DRIVE PINION BEARING
Disassembly
Differential Gear Assembly - 1) Remove bearing carrier and lever gear case assembly form housing. Using suitable puller tool (C-293-P & C-293-39) pull differential side bearing. Keep right and left bearings and shim in sequence for reassembly.
2) Remove ring gear lock plate tabs and loosen bolts in diagonal sequence, then remove ring gear. Drive out pinion shaft lock pin from ring gear back side using a punch, pull out pinion shaft and pinion. Pinion side gears and spacers are now accessible. Note placement of pinion side gear and spacers and ensure they are reassembled in same position.
FIG. 6 REMOVING DRIVE PINION FRONT
BEARING OUTER RACE
Drive Pinion Assembly - 1) Hold end yoke with suitable tool (C-3281) and remove lock nut, then remove end yoke. Using a wheel puller, force out drive pinion with adjusting shim, rear inner bearing rce, spacer and preload adjusting shim.
2) With suitable bearing puller (C-293-P & C-293-39) remove rear bearing inner race and at the same time, pull off drive pinion adjusting shim. Using suitable drift, remove front drive pinion bearing outer race and oil seal. Repeat same procedure to remove bearing outer race.
INSPECTION
Check differential gears for correct tooth contact and replace gears if wear is excessive. Inspect bearing faces for roughness or score marks and replace, if necessary, bearing assembly. Ensure splines of side gears and rear axle shafts fit correctly. Check clearance between pinion gears and pinion shaft, if wear is excessive, replace components.
NOTE - To check gear tooth contact using pain impression method, refer to beginning of this section.
FIG. 7 EXPLODED VIEW OF COLT SEPARATE HOUSING REAR AXLE ASSEMBLY


FIG. 8 CHECKING DIFFERENTIAL PINION
AND SIDE GEAR BACKLASH
REASSEMBLY AND ADJUSTMENT
Case Assembly - 1) Install thrust washers (spacers) behind side gears in their original position and assemble pinion and side gears in differential. Insert both pinion gears, with pinion washers attached, so they mesh with side gears. It may be necessary to slightly rotate pinions to achieve desired meshing. Insert drive pinion shaft.
2) Check pinion and side gear backlash as shown in illustration, if backlash is beyond 0-.003" (0-.08 mm) adjust by selecting a side gear thrust washer (spacer) of correct size. If backlash is to be adjusted, ensure right and left sides are equally shimmed.
3) Thoroughly clean all dirt from ring gear mounting surface of differential case. Install bolts and lock washers. Tighten bolts alternately in a diagonal sequence and bend over lock tabs. Ensure lock washers are in contact with case rib after final torque has been performed.
Drive Pinion - Using a suitable drift and hammer or a press, seat front and rear bearing outer races into gear carrier ensuring that outer races do not cock. Ensure bearing races are completely seated before proceeding. Install shim between drive pinion and rear bearing. Using suitable bearing installer (CT-1075) press bearing onto drive pinion shaft. If drive pinion and bearings are scheduled to be reused, shims should be replaced with new ones of same thickness. In instances where the gear set is to be replaced, install new shims that are the same thickness as the used shims on drive pinion. NOTE - When determining the desired thickness of shim pack, amount of compression (sinkage) of shim pack and wear of the bearing (where old bearing is reused) must be taken into consideration.
Drive Pinion Depth - Install drive pinion spacer, front bearing, washer, end yoke and washer in order of removal. fit pinion shaft retaining nut and slowly tighten nut, continously checking, until pinion bearing preload is 6-9 INCH lbs. (7-10 cmkg) with oil seal not installed. Place suitable cylinder gauge on inside bearing pedestals of gear carrier housing. Place a block gauge on top end of drive pinion and slip a feeler gauge between the two gauges to obtain the correct clearance. The clearance between gauges should be .0118" (.300 mm). This is the standard height and any deviation from this height will be marked on the head of the pinion shaft and side of ring gear. To calculate the correct pinion height,  add or subtract the variation value from the standard height.
NOTE - Stamped values are in hundredth millimeters. Add or subtract the correct amount of shims as necessary.
Pinion Bearing Preload - This adjustment must be performed after the setting of the drive pinion depth. Remove end yoke and insert the bearing preload adjusting shim between pinion spacer and bearing, then tighten end yoke to 9-11 INCH lbs. (10-13 cmkg). In addition to the preload adjusting shims there are spacers available to provide proper adjustment. After finishing adjustment of drive pinion bearing preload remove the end yoke and apply a thin coat of grease to outer surface of oil seal, then drive seal into position in gear carrier. After greasing oil seal lip, insert end yoke and tighten nut.
FIG. 9 MEASURING CLEARANCE
BETWEEN SIDE BEARING AND GEAR CARRIER
Side Bearing Preload - Fit each side bearing into differential case leaving shims out; use suitable tool (CT-1102) for this procedure. Ensure side bearings are completely seated before proceeding. Install differential case assembly on gear carrier, then calculate the clearance bwetween side bearing outer race and gear carrier as shown in illustration. After obtaining clearance add .002" (.05 mm) preload figure to each side. Insert shims equally on both sides. Align gear carrier and bearing cap index marks, then tighten cap retaining bolts.
Ring Gear Deflection - Attach a dial indicator to back side of ring gear and measure deflection. If ring gear has excessive deflection, correct position of assembly in relation to differential case and again perform measurement. Replace ring gear or differential case as necessary.
Drive Pinion Backlash - Measure backlash of drive pinion in at least four different spots on ring gear with drive pinion securely fixed in final position. Set up a dial indicator on ring gear teeth edges. If measured backlash is greater than .005-.007" (.13-.18 mm), shift shims from ring gear side to back of the ring gear to obtain proper backlash. If the measure value is less than standard value, reverse the moving of shims as stated above. Side bearing shims are available in various thicknesses.
NOTE - Check gear tooth contact using point impression method described at beginning of this section.
Final Inspection and Assembly - Lightly coat each gear and bearing before and during reassembly with gear oil. After installing each component, ensure all rotating parts are free to move smoothly. Install differential gear assembly to axle housing after applying sealing agent and tighten gear carrier mounting nuts in diagonal sequence.

Friday, March 2, 2012

0 Austin Marina & Triumph 1975 Axles Repair Manual

AUSTIN MARINA AND TRIUMPH TR7
Models Covered

  • Austin Marina
  • Triumph TR7
DESCRIPTION
Rear axles are hypoid type design with center line of pinion set below centerline of ring gear. The axle shafts, pinion and differential assemblies can be service without removing axle housing from vehicle. Drive pinion bearing preload is maintained by a collapsible spacer on TR7 and by a select fit spacer and shims on Marina. All other differential adjustments are made using selected shims. Adjustment of axle shaft end play is not required.
AXLE RATIO AND IDENTIFICATION
Only one basic axle design is used on these models. To determine axle ratio, divide number of ring gear teeth by number of pinion gear teeth.
REMOVAL AND INSTALLATION
Axle Shafts and Bearings
1) With rear of vehicle raised and wheel removed, remove axle shaft nut and washer. Remove screws retaining brake drum and remove drum. Withdraw rear hub from axle shaft using suitable tool. Disconnect handbrake cable and brake pipe. Remove nuts, washers and bolts retaining brake backplate to axle housing
2) Note installed position of drip lip in relation to brake slave cylinder and remove oil catcher and backplate assembly. Remove rear hub oil seal and housing assembly. Remove oil seal from housing using suitable tool. Remove axle shaft key and place container under axle to collect oil spillage. Withdraw axle shaft from housing using suitable puller. Remove inner oil seal and press bearing from axle shaft.
3) Pack bearing with lithium based grease and dip new oil seal in light oil before reassembling. Install new oil seal with lip of seal facing inwards. Press bearing onto axle shaft until dimension from bearing to threaded end of axle shaft is to specifications. Continue assembling in reverse of disassembly using a new rear hub joint washer and using "Lactite LT 270" or equivalent on axle shaft nut.

PINION FLANGE AND SEAL
1) Raise and support vehicle. Mark propeller shaft and pinion flanges for correct realignment. Disconnect propeller shaft and remove flange nut cotter pin. On TR7, index mark flange, pinon shaft, and nut. Retain flange using suitable tool and remove nut and washer (noting number of turns to remove nut on TR7).
2) Place container under flange to collect oil spillage and remove flange and oil seal. To install, reverse removal procedure noting the following: Soak new seal in light oil for one hour before installing. Install seal with lip of seal facing inward. On TR7, align index mark on flange and shaft and tighten nut the same number of turns required to remove it. Finish tightening nut with index marks aligned.
DIFFERENTIAL CARRIER
Remove both axle shafts and mark differential pinion and propeller shaft for proper realignment on assembly. Disconnect propeller shaft. Place container under axle assembly to collect oil and remove nuts and washers retaining carrier to axle housing. Remove carrier. To reinstall, reverse removal procedure, using a new gasket and suitable gasket sealer.

OVERHAUL
Disassembly
1) With carrier removed, mount unit upright in a vise and mark bearing caps for correct reassembly. Remove bearing cap bolts, washers and caps. Assemble suitable axle stretcher (18G-131) on unit casing and stretch unit case by tightening turnbuckle three or four flats, until differential carrier can be levered out and bearing shims and caps removed. CAUTION - To avoid damaging case, do not spread any more than necessary. Maximum stretch is .008" (.20 mm). Do not pry against stretcher
2) Remove gear carrier bearing caps and mark ring gear and carrier to ensure correct replacement. Remove ring gear retaining bolts and ring gear. Drive out pinion shaft locking pin, then drive out pinion shaft. Remove pinion gears and thrust washers. Remove differential gears and thrust washers. Remove drive flange nut cotter pin and drive flange nut. Using suitable puller, remove drive flange.
3) Press out drive pinion and remove pinion bearing collapsible spacer (TR7) or shims and spacer (Marina). Using suitable press tools, remove inner bearing from pinion. Remove pinion head washer and drift out pinion outer bearing cup, bearing and seal. Drift out pinion inner bearing cup.

INSPECTION
Clean and inspect all components for wear or damage. Ring and pinion gears, differential bearings and pinion bearings must be replaced as matched sets.

REASSEMBLY AND ADJUSTMENT
Side Bearing Preload - 1) Install differential bearing cones in gear carrier using suitable tool.  Install two differential gears in carrier, ensuring each thrust washer is correctly positioned. Position two pinion gears, one each side of carrier and mesh them with differential gear, turn gears and ensure two pinions rotate into mesh and align with pinion shaft hole in carrier. Install pinion shaft.
2) Press each pinion firmly into mesh with differential gears and assess required pinion thrust washer thickness required to achieve ZERO backlash. Remove pinion shaft and pinions and install thrust washers. Reinstall pinion gears and shafts with thrust washers and check that zero backlash exists. Lubricate components and install pinion shaft locking pin and secure by peening metal of differential carrier.
FIG. 1 EXPLODED VIEW OF AUSTIN MARINA AND TRIUMPH TR7
DRIVE AXLE AND PROPELLER SHAFT ASSEMBLIES

FIG. 2 CHECKING RING GEAR
RUNOUT AND TOTAL SIDE FLOAT
3) Clean ring gear mounting and carrier face and install ring gear, tighten bolts. Assemble carrier bearing cups to bearings and position assembly in case; do not install bearing shims. Install bearing caps in correct position. Using dial indicator and suitable adapters, ensure that ring gear runout does not exceed specifications. Remove bearing caps and press differential bearing cups into bearings and move carrier assembly to axle side of case. Zero dial indicator and move carrier assembly fully in opposite direction. The indicator reading should be noted for future reference as "Total Side Float". Remove differential assembly from case.
FIG. 3 CHECKING DRIVE PINION GEAR DEPTH

Drive Pinion Depth - 1) Install inner and outer pinion bearing cups to case using suitable tools. Install pinion inner bearing to dummy pinion 18G-191 M). NOTE - Dummy pinion incorporates standard pinion head washer of .077" (1.95 mm) thickness. Oil bearing and install dummy pinion, outer bearing, tool spacer, washer and nut. Tighten nut gradually until bearing preload specification is obtained. Clean dummy pinion head and position dial indicator gauge foot of tool 18G-191 on dummy head and zero indicator.
2) Mode dial indicator over center of one differential bearing bore and note reading. Repeat for opposite bearing bore. Average these two measurements and perform the following calculation.
EXAMPLE
Average of bore measurement......................  .002" (.051 mm)
PLUS dummy pinion washer allowance....... .077" (1.956 mm)
Required size of pinion head washer...........  .079" (2.007 mm)
If the etched marking on pinion face is on "N" or a dot ".", indicating normal, no change to above dimension is required. If etched marking is positive (+), reduce size of required pinion washer by amount marked. If etched marking is negative (-) increase size of required pinion washer by amount of marked. Remove dummy pinion and remove inner bearing from dummy pinion.

FIG. 4 CHECKING RING GEAR-TO-DRIVE
PINION GEAR BACKLASH
Pinion Bearing Preload With Spacer and Shims - 1) Place selected pinion depth washer on on pinion and install inner bearing using suitable tools. Oil bearing and install drive pinion gear in housing. Install bearing spacer, chamferred end towards drive flange. Install shims, oil and install outer bearing. Install drive flange washer and nut. Gradually tighten nut, but do not exceed torque specification, and check preload during tightening operation.
2) While gradually tightening nut, keep checking the pinion bearing preload using an inch pound torque wrench. Tighten nut as required to obtain  specified pinion bearing preload. NOTE - If pinion bearing preload torque specification is exceeded, a new collapsible spacer will be required and this procedure repeated.

FIG. 5 CHECKING RING GEAR-TO
DRIVE PINION "IN-OUT"
MESH CLEARANCE
Adjusting Backlash - 1) Place bearing cups on differential bearing and install carrier in case. Position dial indicator with suitable adapters on ring gear side of case. Move ring gear fully into mesh with pinion and zero indicator on rear of ring gear. Move ring gear side is butted in housing. The indicated measurement should be noted as the "In-Out" mesh clearance.
2) Perform the following calculation:
EXAMPLE
    "In-Out mesh clearance (1)............................   .0025" (.63 mm)
     MINUS Specified backlash...........................   .005" (.13 mm)
     Required ring gear side shim pack...............   .020" (.50 mm)
     "Total Side Float" (2).....................................   .060" (1.52 mm)
     MINUS  ring gear side shim pack................   .020" (.50 mm)
     Required shim pack opposite ring gear......   .040" (1.02 mm)
(1) - Value from 1) above.
(2) - Value from 3) under "Side Bearing Prelaod"
Add a value of .002" (.51 mm) to each shim pack calculated above for preload
3) Stretch case specified amount and from calculations made above, select required shim pack. Install differential assembly in case with shim packs. Loosen case stretcher and remove. Install bearing caps as originally marked and tighten bolts. Rotate pinion to settle differential bearings and position dial indicator using suitable adapters to measure ring gear backlash. Measure backlash at several locations, it must be to specifications. If not, interchange shims from side to side to achieve specified backlash. NOTE - A movement of .002" (.05 mm) shim thickness from one bearing to the other will vary backlash by about .002" (.05 mm). Reinstall differential assembly in rear axle housing.

0 Datsun/Nissan 1975 Drive Axles Separate Carrier Repair Manual

DATSUN SEPARATE CARRIER
Models Covered

  • B210 Series
  • 610 Station Wagon
  • 620 Series
  • 710 Series
DESCRIPTION
Differential gear carrier assembly has a hypoid type pinion and ring gear set. The gear carrier is constructed of cast iron. The drive pinion is mounted in two tapered roller bearings that are preloaded by a collapsible spacer or non-adjustable spacer. Drive pinion is aligned into position with a shim located between shoulder on drive pinion and rear bearing. Differential case is supported in carrier by two tappered roller side bearings. The side bearings are preloaded by inserting shims between bearings and differential. Case houses two side gears that mesh with two pinion gears mounted on pinion shaft. The pinion shaft is held in case with a lock pin. Pinions and side gears are set in front of thrust washers.
AXLE RATIO AND IDENTIFICATION
Datsun does not identify rear axle with a particular outside identification marking, however all models use same basic type of removable carrier rear axle. It should be noted that part or model numbers may vary between vehicle models, but the internal design is similar. The following table indicates the axle ratios that are available, any not found in table may be computed by dividing number of ring gear teeth by number of pinion gear teeth.
                        Rear Axle Ratio
Application                                  Ratio
B210...........................................  3.889-1
610 & 710..................................  3.700-1
620.............................................  4.375-1
FIG. 1 EXPLODED VIEW OF DATSUN SEPARATE CARRIER DIFFERENTIAL ASSEMBLY

REMOVAL AND INSTALLATION
Axle Shafts and Bearings
Removal, 610 & 620 - Raise and support vehicle and remove rear wheels. Disconnect parking brake cable by removing adjusting nut and clamps (620) or by removing cross-rod clevis pin (610). Disconnect and plug wheel cylinder inlet line and remove brake drum. Remove four brake assembly retaining nuts and remove axle assembly using a slide hammer.
Disassembly - Place axle in suitable work stand and bend lock washer tabs away from nut. Remove lock nut, then using axle shaft bearing puller, withdraw wheel bearing with cage and brake assembly. If necessary, remove oil seal from inside bearing cage. With a brass drift and hammer top against bearing race surface until race is remove.
Reassembly - Fit bearing race and rubber grease seal to cage by carefully seating with brass hammer. After seal installation, fill lip with grease. Install brake assembly and bearing cage on axle, then fit bearing race using a brass drift. Press in new bearing, then tighten lock nut and bend up lock tabs.
Installation - Apply wheel bearing grease in recess of axle case end. Install axle shaft after first replacing oil seal in axle housing. Ensure seal is not damaged during installation. Adjust axial end play using proper shim pack. To complete installation, reverse removal procedure. NOTE - Adjustment is .012-.035" (.30-.90 mm) on one side (either side) and .001-.006" (.02-.15 mm) on the other (opposite) side.
FIG. 2 REMOVING LOCK NUT ON
610 AND 620 MODELS
Removal, B210 and 710 - Raise and support vehicle and remove rear wheels. Disconnect wheel cylinder inlet line and plug opening. Disconnect parking brake linkage. Remove brake drum and four nuts mounting brake backing plate to axle housing. Remove axle assembly from housing using a slide hammer. Remove oil seal and replace at this time.
Inspection - Check following components and replace any found defective. Inspect axle shaft deflection, oil seal tip, and bearing.
Disassembly - Place axle shaft assembly into suitable holding device and chisel off wheel bearing collar; then remove wheel bearing.
FIG. 3 LOCATION FOR CHECKING
CLEARANCE BETWEEN WHEEL
BEARING AND AXLE TUBE
Reassembly - Install bearing spacer, bearing and new bearing collar onto axle shaft. Bearing collar must be installed under 3-5 tons force.
Installation - Fit axle into axle housing being careful not to damage oil seal. Adjust clearance between wheel bearing and axle tube end using .039" (1.0 mm) shim as shown in illustration. Measure axial end play with a dial indicator, reading should be .018" (.45 mm). Reverse removal procedure for remaining components.
PINION FLANGE SEAL
NOTE - The following procedure can only be performed on those models that use non-adjustable spacer (not collapsible spacer type).
Removal - Raise and support rear end of vehicle, then drain gear oil. Index mark propeller shaft and companion flange, then detach shaft and wire out-of-way. Remove drive pinion nut and using suitable puller extract companion flange. With special tool (ST33290001) remove oil seal.
Installation - Set new oil seal into position and pack grease between seal lips. Position companion flange and flat washer on drive pinion, then tighten nut and check bearing preload.
DIFFERENTIAL CARRIER
Removal - Raise and support vehicle on safety stands placed under rear axle housing. Drain gear lubricant. Index mark propeller shaft and remove. Withdraw rear axle shafts as previously described. Remove nuts mounting differential gear carrier to rear axle housing and lift out gear carrier.
Installation - To install differential gear carrier, reverse removal procedure and tighten nuts.

AXLE ASSEMBLY
Removal - Raise and support vehicle safety stands. Place a floor jack under center of axle housing. Remove rear wheels. Index mark propeller shaft and companion flange so components can be realigned in original position. Disconnect bolts mounting propeller shaft and carefully guide shaft from vehicle. Separate parking brake linkage at rear coupling and place forward out-of-way. Disconnect brake line rear union and plug opening. Disconnect shock absorbers at lower mount and compress until clear. Lower jack under axle housing and remove nuts and U-bolts securing leaf springs. With axle housing balanced on floor jack, carefully maneuver from vehicle.
Installation - To install axle housing, reverse removal procedure noting the following. Ensure propeller shaft index marks are properly aligned. Be sure U-bolts are not twisted over axle housing and that vehicle weight is on wheels when lower end of shock absorber is tightened.

OVERHAUL
Disassembly
NOTE - Predisassembly inspection of ring gear backlash and gear tooth contact can indicate where possible problems may be oriented. See Gear Tooth Contact at beginning of this section.
1) With differential carrier mounted in suitable work stand, index mark side bearing caps and carrier. Remove bearing caps and lift out differential assembly. Remove drive pinion lock nut and pull companion flange off using a gear puller. Remove drive pinion together with rear bearing inner race, spacer and washer. Drive pinion can be feed by tapping front end of assembly. If necessary, extract oil seal and withdraw front bearing inner race.
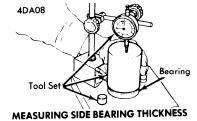
FIG. 4 MEASURING SIDE BEARING
THICKNESS
2) Use suitable puller (ST30031000) and extract bearing from drive pinion gear. Remove front and rear bearing races using a drift. Disassemble differential gear case as follows: Using suitable puller (ST33051001) remove side bearings. Keep right and left side components separate for reassembly. Bend back ring gear retaining bolt lock tabs and remove bolts by loosening in a diagonal sequence. Drive out pinion shaft lock pin and remove pinion gears, side gears and thrust washers. Identify gears and thrust washers for proper reassembly.
INSPECTION
Thoroughly clean all disassembled parts and visually inspect for excessive wear. Check all gears for wear and replace when necessary. NOTE - Drive pinion and ring gear are replaced only as a set. Inspect thrust washer and surfaces can be sure they are free from surface scratches.
REASSEMBLY
FIG. 5 CHECKING DRIVE
PINION HEIGHT ADJUSTMENT
Case Assembly - Fit pinion and side gears and thrust washers in differential case. Assemble pinion shaft to differential case so lock pin holes align with shaft. Inserting proper side gear thrust washers, obtain specified clearance between rear face of side gear and thrust washer. Insert pinion shaft lock pin and using a punch, secure into place. Lightly oil gear tooth areas and all thrust, then check that they are free to run smoothly. Fit ring gear on differential case, tighten bolts diagonally, and bend over lock tabs. If side bearing is to be replaced, measure thickness of new ones using suitable tool set as shown in illustration. Normal bearing thickness should be as specified. Using suitable press seat side bearing cone into differential case.
Drive Pinion Height - Pinion height is adjusted with drive pinion adjusting washer placed behind the drive pinion gear. Variation from the standard size to the drive gear center is marked on drive pinion gear head. If tolerance is greater than standard size, number is marked in "+", if less than standard size, marking is "-". Install front and rear drive pinion outer races in gear carrier. Fit drive pinion adjusting washers and rear bearing on suitable dummy shaft. Position dummy shaft in final drive housing without drive pinion adjusting spacer, then put on front pinion bearing and companion flange.
FIG. 6 MEASURING CLEARANCE BETWEEN
HEIGHT GAUGE AND DUMMY SHAFT
Tighten drive pinion nut to specified preload setting. Ensure not to overtighten drive pinion nut. Fit suitable drive pinion height gauge on final drive housing and measure clearance between end of gauge and surface of dummy shaft as shown in illustration. To calculate thickness of needed drive pinion adjusting washer, use the following formula
T = W + N - (Hx.01) - .2
T = Thickness of needed shim.
W = Thickness of temporary shim.
N = Clearance between depth gauge and dummy shaft.
H = Figure stamped on drive pinion head.
NOTE - Formula values are expressed in millimeters.
Remove dummy shaft from gear carrier, take out pinion rear bearing from dummy shaft, select correct shims based on calculation and refit pinion rear bearing and drive pinion. Ensure face side of shims are toward back of pinion gear.
Drive Pinion Preload, Non-Collapsible Spacer Type - Adjustment of drive pinion preload is accomplished with spacer and washers placed between front and rear inner bearing races. NOTE - Adjustment must be performed without oil seal installed. Proceed with adjustment as follows. Liberally lubricate pinion bearings and install in the following order; drive pinion, spacer, washer, front inner race, companion flange and flat washer. Tighten nut to specified torque. Rotate pinion by hand so pinion nut is not over tightened. Increase spacer and washer thickness when pinion will no longer turn. Using a suitable pinion bearing preload gauge, determine the correct washer and spacer needed to provide specified preload. Spacers and washers are available in various sizes. Insert proper spacer and washer and again check preload. If preload is within specifications, remove drive pinion nut and companion flange, then press in a new oil seal. Install companion flange and tighten nut.
FIG. 7 CALCULATING SIDE BEARING
SHIM THICKNESS
Drive Pinion Preload, Collapsible Spacer Type - After obtaining final pinion bearing height, lubricate front bearing and place into carrier. Fit new oil seal in carrier and fill space between seal lips with grease. Slip new collapsible spacer on drive pinion, then lubricate pinion rear bearing. Insert companion flange in oil seal while holding flange tightly against pinion front bearing cone. Workign from back of carrier, insert drive pinion into the companion flange. Ensure drive pinion threads and mounting nut are dirt free, then holding companion flange, tighten nut . This step will pull drive pinion into front bearing cone bearing end play will be reduced. With end play still in evidence, companion flange will be felt bottoming on collapsible spacer. Slowly turn nut and continously check end play to ensure bearing preload does not exceed specifications. When end play is eliminated final preload is being approached. Turn pinion in both direction using suitable gauge (ST31275000).
NOTE - Never try to decrease bearing preload by backing off pinion nut; always replace collapsible spacer.
Backlash and Side Bearing Preload - 1) Preload is adjusted with shims. Procedure is done after overhaul work has been completed on differential assembly. When assembling without changing side bearings, install shims of original thickness. If bearings are being replaced, use the following formula to determine the required thickness of adjusting shims:
Left Side: T = (A-C+D-H') x .01 + .2 + E
Right Side T = (B-D + H') x .01 + .2 + f
T = Shim thickness.
B = Figure stamped on right side bearing.
C & D = Figure stamped on differential case (+ or - number).
E & F = Deviation from standard bearing thickness.
H' = Figure stamped on ring gear.
FIG. 8 MEASURING DISTANCE BETWEEN
BEARING CAPS
NOTE - Formula values are expressed in millimeters.
2) Side bearing thickness is measured using a suitable press (ST325050000) and applying approximately 5.5 lbs. (2.5 kg). Measure thickness in at least three locations.
3) Fit side bearing shim of differential case and press in both side bearing inner races. Place differential case assembly into gear carrier using a rubber mallet. Align index marks on bearing cap and gear carrier, then install bearing cap on carrier.
4) As a second check, measure distance between bearing caps using a micrometer (see illustration). Specification obtained should be as indicated in table. Correct any deviation with the proper shim.
FIG. 9 MEASURING RING GEAR
BACKLASH
5) Using a suitable dial indicator, measure ring gear-to-drive pinion backlash. Measure ment should be as indicated in specifications. If backlash is less than specified, decrease thickness of left shim and increase right shim by same amount. If backlash is more than specified, reverse placement of shims in procedure above. Using same dial indicator check ring gear deflection, runnout should be as specified.
6) Check side bearing preload by measuring the amount of rotating torque needed to turn companion flange (see illustration). Check gear tooth contact pattern and correct and problem. NOTE - See Gear Tooth Contact Pattern at beginning of this section.

FIG. 10 MEASURING DRIVE PINION PRELOAD


0 Datsun/Nissan 1969-74 Drive Axles Repair Manual

1969-74 DATSUN SEPARATE CARRIER
MODELS COVERED:

  • B210 (1974)
  • 311 (1968-70)
  • 510 Station Wagon (1968-72)
  • 521 Pickup (1969-72)
  • 610 Station Wagon (1973-74)
  • 620 Pickup (1972-74)
  • 710 (1974)
  • 1200 (1971-73)
DESCRIPTION
Differential gear carrier assembly has a hypoid type pinion and ring gear set. The gear carrier is constructed of cast iron. The drive pinion is mounted in two tapered roller bearings that are preloaded by a collapsible spacer or by non-adjustable spacer. Drive pinion is aligned into position with a shim located between shoulder on drive pinion and rear bearing. Differential case is supported in carrier by two tapered roller side bearings. The side bearings are preloaded by inserting shims between bearings and differential. Case housed two side bears that mesh with two pinion gears mounted on a pinion shaft. The pinion shaft is held in case with a lock pin. Pinions and side gears are set in front of thrust washers.
AXLE RATIO AND IDENTIFICATION
Datsun does not identify rear axle with a particular outside identification marking. However all models are some basic type of removable carrier rear axle. It should be noted that part or model numbers may vary between vehicle models, but the internal design is similar. The following table indicates the axle ratios that are available, any not found in table may be computed by dividing number of ring gear teeth by number of pinion gear teeth.
                  Rear Axle Ratio
Application                        Ratio
B210
   1974............................... 3.900
610
   1973................................3.889
620
   1972-74.
      Man. Trans................4.375
      Auto. Trans...............4.625
710
   1974
      Man. Trans................4.111
      Auto. Trans...............3.889
1200
   1971-73..........................3.900

REMOVAL AND INSTALLATION
AXLE SHAFT AND BEARINGS
Removal 311, 521 and 620 - Raise vehicle and place an safety stands, remove rear wheels. Disconnect and plug wheel cylinder inlet line, remove brake drum. If drum is hard to pull off, lightly tap outside of casting to free or back off shoe adjuster(s). Remove four brake assembly retaining nuts. Pull out axle shaft and brake assembly using slide hammer.
Inspection - Using a dial indicator, check axle shaft deflection, maximum allowable bending is .039" (1.0 mm). Replace axle shaft or components if any of the following conditions exist seal surface and/or thrust block side end surface scared; bearing rust, rough rolling or chipped; oil seal cracked or otherwisde damaged.
Disassembly - Place axle in suitable work stand and bend lock washer tabs away from nut. Remove lock nut, then using axle shaft bearing puller, withdraw wheel bearing with cage and brake assembly. If necessary, remove oil seal from inside bearing cage. With a brass drift and hammer top against bearing race surface until race is removed.
Reassembly - Fit bearing race and rubber grease seal to cage by carefully seating with brass hammer. After seal installation, fill up with grease. Install brake assembly and bearing cage on axle, then fit bearing race using a brass drift. Press in new bearing then tighten lock nut and bend up lock tabs.


REMOVING LOCK NUT
(620 MODEL SHOWN)
Installation - Apply wheel bearing grease in races of axle case end. Install axle shaft after first replacing oil seal in axle housing. Ensure seal is not damaged using installation. Adjust axial end play using proper shim pack. To complete installation, reverse removal procedure. NOTE - Adjustment is .012-.035" (.30-90 mm) on one side (either side) and .001-.006" (.02-.15 mm) on the other (opposite) side.
Removal B210, 510, 610, 710 and 1200 - Raise rear of vehicle and support on safety stands, remove rear wheels. Disconnect wheel cylinder inlet line and plug opening. Disconnect parkign brake linkage and move out-of-way. Remove brake drum and four nuts mounting brake book plate to axle case. Using suitable puller, remove axle shaft assembly. Remove oil seal and replace at this time.
CLEARANCE BETWEEN
WHEEL BEARING
AND AXLE TUBE
Inspection - Check following components and replace any found defective. Inspect axle shaft deflection, oil seal tip, and bearing.
Disassembly - Place axle shaft assembly into suitable holding device and chisel off wheel bearing collar; then remove wheel bearing.
Reassembly - Install bearing spacer, bearing and new bearing collar onto axle shaft. Bearing collar must be installed under 3-5 tons foce.
Installation - Fit axle shaft into axle housing being careful not to damage oil seal. Adjust clearance between wheel bearing and axle tube and using  .039" (1.0 mm) shim as shown in illustration. Measure axial end play with a dial indicator, reading should be .018" (.45 mm). Reverse removal procedure for remaining components

PINION FLANGE SEAL
NOTE - The following procdure can only be performed on those models that use non-adjustable spacer (not collapsible spacer type).
Removal - Raise and support rear end of vehicle, then drain gear oil. Index mark propeller shaft and companion flange, then detach shaft and wire out-of-way. Remove drive pinion nut and using suitable puller extract companion flange. With special tool (ST33290001) remove oil seal.
Installation - Set new oil seal into position and pack grease between seal lips. Position companion flange and flat washer on drive pinion, then tighten nut and check bearing preload.

DIFFERENTIAL CARRIER
Removal - Raise and support vehicle on safety stands placed under rear axle housing. Drain gear lubricatn. Index mark propeller shaft and remove. Withdraw rear axle shafts as previously described. Remove nuts mounting differential gear carrier to axle housing and lift out gear carrier.
Installation - To install differential gear carrier, reverse removal procedure and tighten nuts.

AXLE ASSEMBLY
Removal - Raise rear of vehicle and place on safety stands. Place a floor jack under center of axle housing. Remove rear wheels. Index mark propeller shaft and companion flange so components can be realigned in original position. Disconnect bolts mounting propeller shaft and carefully guide shaft from vehicle. Separate parking brake linkage at rear coupling and place forward out-of-way. Disconnect brake line rear union and plug opening. Disconnect shock absorbers at lower mount and compress until clear. Lower jack under axle housing and remove nuts and U-bolts securing leaf springs. With axle housing balanced on floor jack, carefully maneuver from vehicle.
Installation - To install axle housing, reverse removal procedure noting the following: Ensure propeller shaft index marks are properly aligned. Be sure U-bolts are not twisted over axle housing and that vehicle weight is on wheels when lower end of shock absorber is tightened.

OVERHAUL
Disassembly
NOTE - Prediassembly inspection of ring gear backlash and gear tooth contact can indicate where possible problems may be oriented. See Gear Tooth Contact at beginning of this section
1) With differential carrier mounted in suitable work stand, index mark side bearing caps and carrier. Remove bearing caps and lift out differential assembly. Remove drive pinion lock nut and pull companion flange off using a gear puller. Remove drive pinion together with rear bearing inner race, spacer and washer. Drive pinion can be freed by tapping front ed of assembly. If necessary, extract oil seal and withdraw front bearing inner race.
2) Using suitable puller (ST300310000) extract pinion. To take out both front and rear bearing outer races, use drift placed on race side surface and tap out. To disassemble differential gear case proceed as follows: Using a suitable puller (ST3305001) remove side bearings. Keep right and left side components separated for reassembly. Lift ring gear bolt lock tabs and remove bolts by loosening in a diagonal sequence. Using a punch, top out pinion gear lock pin and remove pinion gears, side gears and thrust washers. Identify gears and thrust washers for ireinstallation.

INSPECTION
Thoroughly clean all disassembled parts and visually inspect for excessive wear. Check all gears for wear and replace when necessary. NOTE - Drive pinion and ring gear are replaced only as a set. Inspect thrust washer surfaces and be sure they are free from surface scratches.

REASSEMBLY
ADJUSTING PINION HEIGHT
Case Assembly - Fit pinion and side gears and thrust washers in differential case. Assemble pinion shaft to differential case . Assemble pinion shaft to differential case so lock pin holes align with shaft. Inserting proper side gear thrust washers, obtain specified clearance between rear face of side gear and thrust washer. Insert pinion shaft lock pin and using a punch, secure into place. Lightly oil gear tooth areas and all thrust washers surfaces. then checkt that they are free to turn smoothly. Fit ring gear on differential case, tighten bolts diagonally , and bend over lock tabs. If side bearing is to be replaced, measure thickness of new ones using suitable tool set as shown in illustration. Normal bearing thickness should be as specified. Using suitable press, seat side bearing cone into differential case.
Drive Pinion Height - Pinion height is adjusted with drive pinion adjusting washer placed behind the drive pinion gear. Variation from the standard size ot the drive gear center is marked on drive pinino gear head. If tolerance is greater than standard size, number is marked in "+", if less than standard size, marking is "-". Install front and rear drive pinion outer races in gear carrier. Fit drive pinion adjusting washers and bearing on suitable dummy shaft. Position dummy shaft in final drive housing without drive pinion adjusting spacer, then pu on front pinion bearing and companion flange. Tighten drive pinion nut to specified preload setting. Fit suitable drive pinion height gauge on final drive housing and measur clearance between end of gauge and surface of dummy shaft as shown in illustration. To calculate thickness of needed drive pinion adjusting washer, use the following formula:
MEASURING CLEARANCE
BETWEEN HEIGHT GAUGE
AND DUMMY SHAFT
T = W + N - (Hx..01) - .02
T = Thickness of needed shim.
W = Thickness of temporary shim.
N = Clearance between depth gauge and dummy shaft.
H = Figure stamped on drive pinion head.
NOTE - Formula values are expressed in millimeters.
Remove dummy shaft from gear carrier, take out pinion rear bearing from dummy shaft, select correct shims based on calculation and refit pinion rear bearing and drive pinion. Ensure face side of shims are toward back of pinion gear.
Drive Pinion Preload, Non-Collapsible Spacer Type - Adjustment of drive pinion preload is accomplished with spacer and washers placed between front and rear inner bearing races. NOTE - Adjustment must be performed without oil seal installed. Proceed with adjustment as follows:
Liberally lubricate pinion bearings and install in the following order; drive pinion, spacer, washer, front inner race, companion flange and flat washer. Tighten nut to specified torque. Rotate pinion by hand so pinion nut is not over tightened. Increase spacer and washer thickness when pinion will no longer turn. Using a suitable pinion bearing preload gauge, determine the correct washer and spacer needed to provide specified epreload. Spacers and washers are available in various sizes. Insert proper spacer and washer and again check preload. If preload is within specifications, remove drive pinion nut and companion flange, then press in a new oil seal. Install companion flange and tighten nut.
Drive Pinion Preload, Collapsible Spacer Type - After obtaining final pinion bearing height, lubricate front bearing and place into carrier. Fit new oil seal in carrier and fill space between seal lips with grease. Slip new collapsible spacer on drive pinion, then lubricate pinion rear bearing. Insert companion flange in oil seal while holding flange tightly against pinion bearing cone. Working from back of carrier, insert drive pinion into the companion flange. Ensure drive pinion threads and mounting nut are dirt free, then holding companion flange, tighten nut. This step will pull drive pinion front bearing cone and flange. When drive pinion is pulled into bearing cone bearing end play will be reduced. With end play still in evidence, companion flange will be felt bottoming on collapsible spacer. Slowly turn nut and continiously check end play to ensure bearing preload does not exceed specifications. When end play is eliminated final preload is being approached. Turn pinion in both direction to set bearing. Adjust bearing preload to specifications using suitable gauge (ST31275000).
NOTE - Never try to decrease bearing preload by backing off pinion nut; always replace collapsible spacer.
CALCULATING SIDE BEARING SHIM
THICKNESS
Backlash and Side Bearin Preload - 1) Preload is adjusted with shims. Procedure is done after overhaul work has been completed on differential assembly. When assembling without changing side bearings, install shims of original thickness. If bearings are being replaced, use the following formula to determine the required thickness of adjusting shims:
Left Side: T = (A-C + D-H') x .01 + .2 + E
Right Side T = (B-D + H') x .01 + .2 + F
T = Shim thickness.
B = Figure stamped on right side bearing.
C & D = Figure stamped on differential case (+ or 0 number).
E & F = Deviation from standard bearing thickness.
H' = Figure stamped on ring gear.
MEASURING DISTANCE BETWEEN
BEARING CAPS
NOTE - Formula values are expressed in millimeters.
2) Side bearing thickness is measured using a suitable press (ST3250S0000) and applying approximately 5.5 lbs. (2.5 kg). Measure thickness in at least three locations.
3) Fit side bearing shim of differential case and press in both side bearing inner races. Place differential case assembly into gear carrier, then install bearing cap on carrier.
4) As a second check, measure distance between bearing caps using a micrometer (see illustration).. Specification obtained should be as indicated in table. Correct any deviation with the proper shim.
MEASURING RING GEAR BACKLASH
5) Using suitable dial indicator, measure ring gear-to-drive pinion  backlash. Measurement should be as indicated in specifications. If backlash is less than specified, decrease the thickness of left shim and increase right shim by some amount. If backlash is more than specified, reverse placement of shims in procedure above. Using same dial indicator check ring gear deflection, runout should be as specified.
6) Check side bearing preload by measuring amount of rotating torque needed to turn compoanion flange (see illustration). Check gear tooth contact pattern and correct any problem. NOTE - See Gear Tooth Contact Pattern at beginning of this section.
MEASURING DRIVE PINION PRELOAD


2012 BY ManualTransformerOnline Manual Sharing